Table of Contents
CADBase Library
CADBase Library is a bridge between FreeCAD and the CADBase platform, adding cloud design advantages to local design:
- ✓ Accessibility — work with projects from any device.
- ✓ Project Storage — synchronize FreeCAD with cloud storage.
- ✓ Team Collaboration — parallel development of components and modifications.
- ✓ Security — reliable storage and efficient version control.
- ✓ Component Library — use ready-made parts with models for FreeCAD.
Save projects through CADBase Library for FreeCAD and access components from any computer.
File Sets on CADBase Platform
File Sets Concept
File sets organize data by applications within component modifications. For example, a designer works with the FreeCAD set, while documentation is attached directly to the modification.
There are no restrictions on data storage in sets — you can upload any files.
Set Specialization
- FreeCAD — drawings, models, and resources for FreeCAD design.
- Other sets — files from various CAD and software applications.
How the Addon Works
The addon creates a folder hierarchy for components and synchronizes only FreeCAD set files. This allows teams to work in parallel across different applications without version conflicts.
Installation and Setup
Installation via FreeCAD Addon Manager
This is the simplest way to install CADBase Library:
- In FreeCAD main menu, select Tools → open Addon Manager.
- Wait for the list of available addons to update.
- Type "CADBase Library" in the search bar and select the found workbench.
- Click the Install button and wait for the process to complete.
- Restart FreeCAD.
- After restart, CADBase Library will appear in the workbench list.
CADBase Library requires FreeCAD version 0.21 or higher.
Configuration
First Launch and Setup
After restarting FreeCAD:
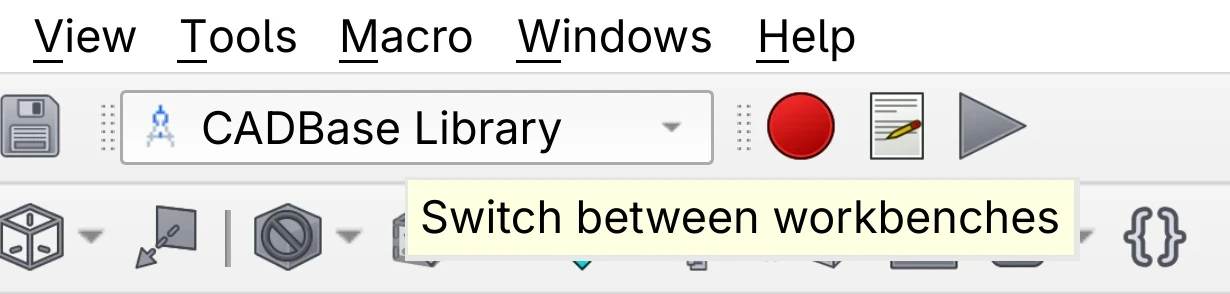
- Select the CADBase Library workbench.
- Specify the folder for local library.
Your components from CADBase will be available in this folder.
Workbench Configuration
To open the CADBase Library Configuration window:
- In the CADBase Library window, go to the Options tab.
- Click the
 Settings button.
Library Path
Specify the folder on your computer where the local component library will be stored.
Changes will take effect after restarting FreeCAD. When changing the path, existing files are not automatically moved.
Server Address
Specify the URL or IP address of the CADBase server for connection.
To reset the setting to default, simply click Set official.
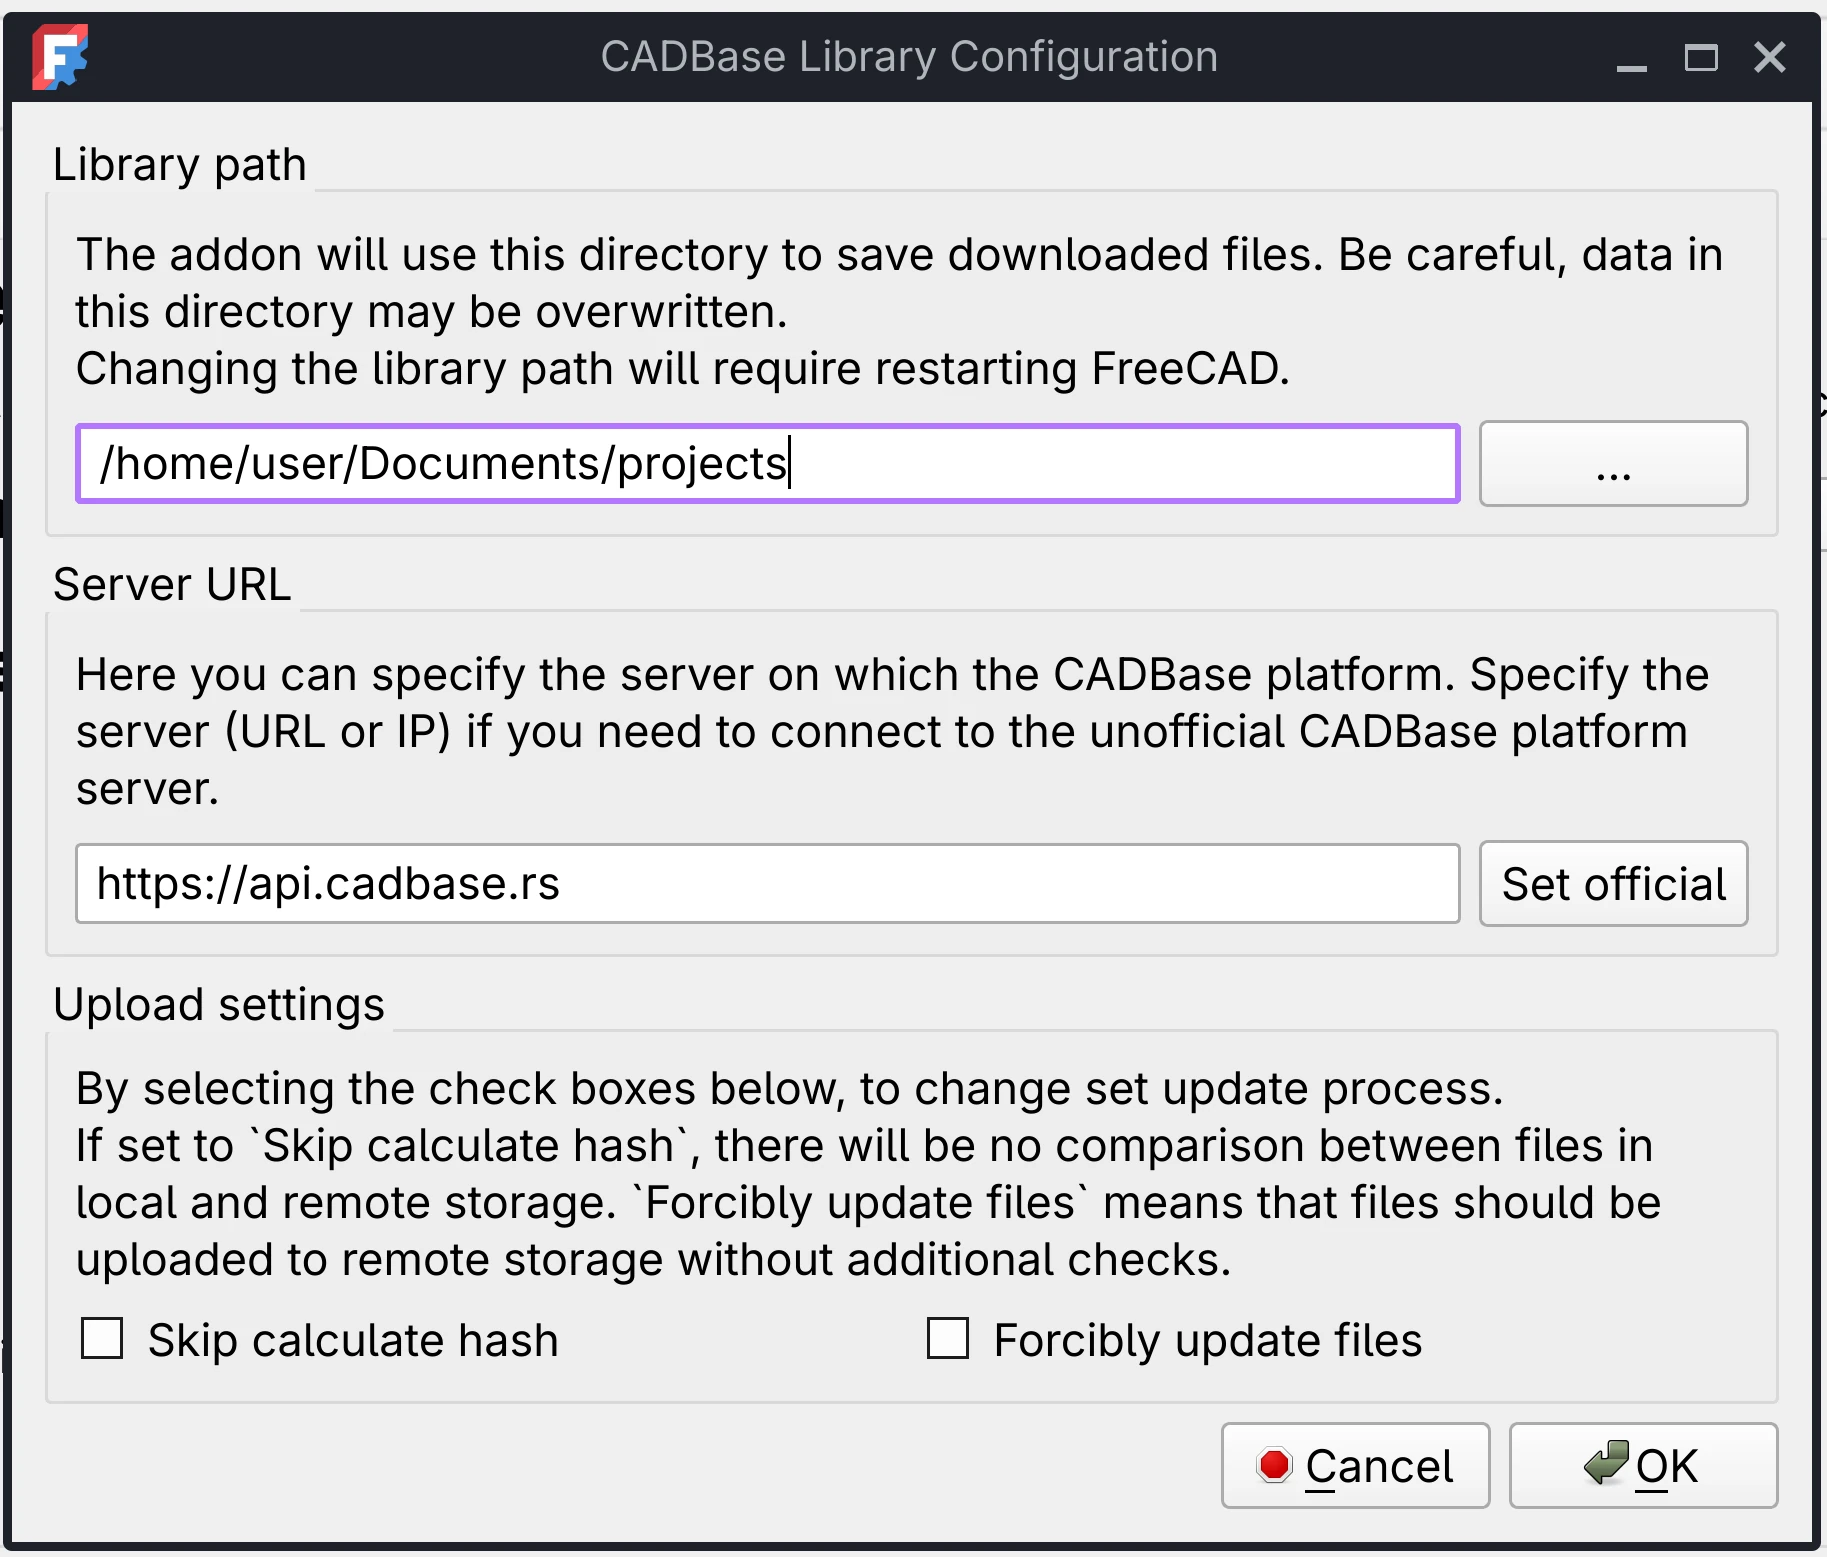
Upload Parameters
Configure cloud storage logic:
Skip calculate hash
Uploads only new files without checking changes in existing ones
Forcibly update files
Updates all files in the cloud, ignoring checks
These settings only affect data upload to the cloud. When downloading, files are never automatically overwritten.
Authorization on CADBase Platform
To work with cloud storage, you need to obtain an access token:
- Click the
 Authorization button in the CADBase Library window.
 - In the opened window enter:
- Username (your login)
- Password
- For new users: check Set to create a new user...
- Click the OK button to get the token.
- Wait for authorization to complete.
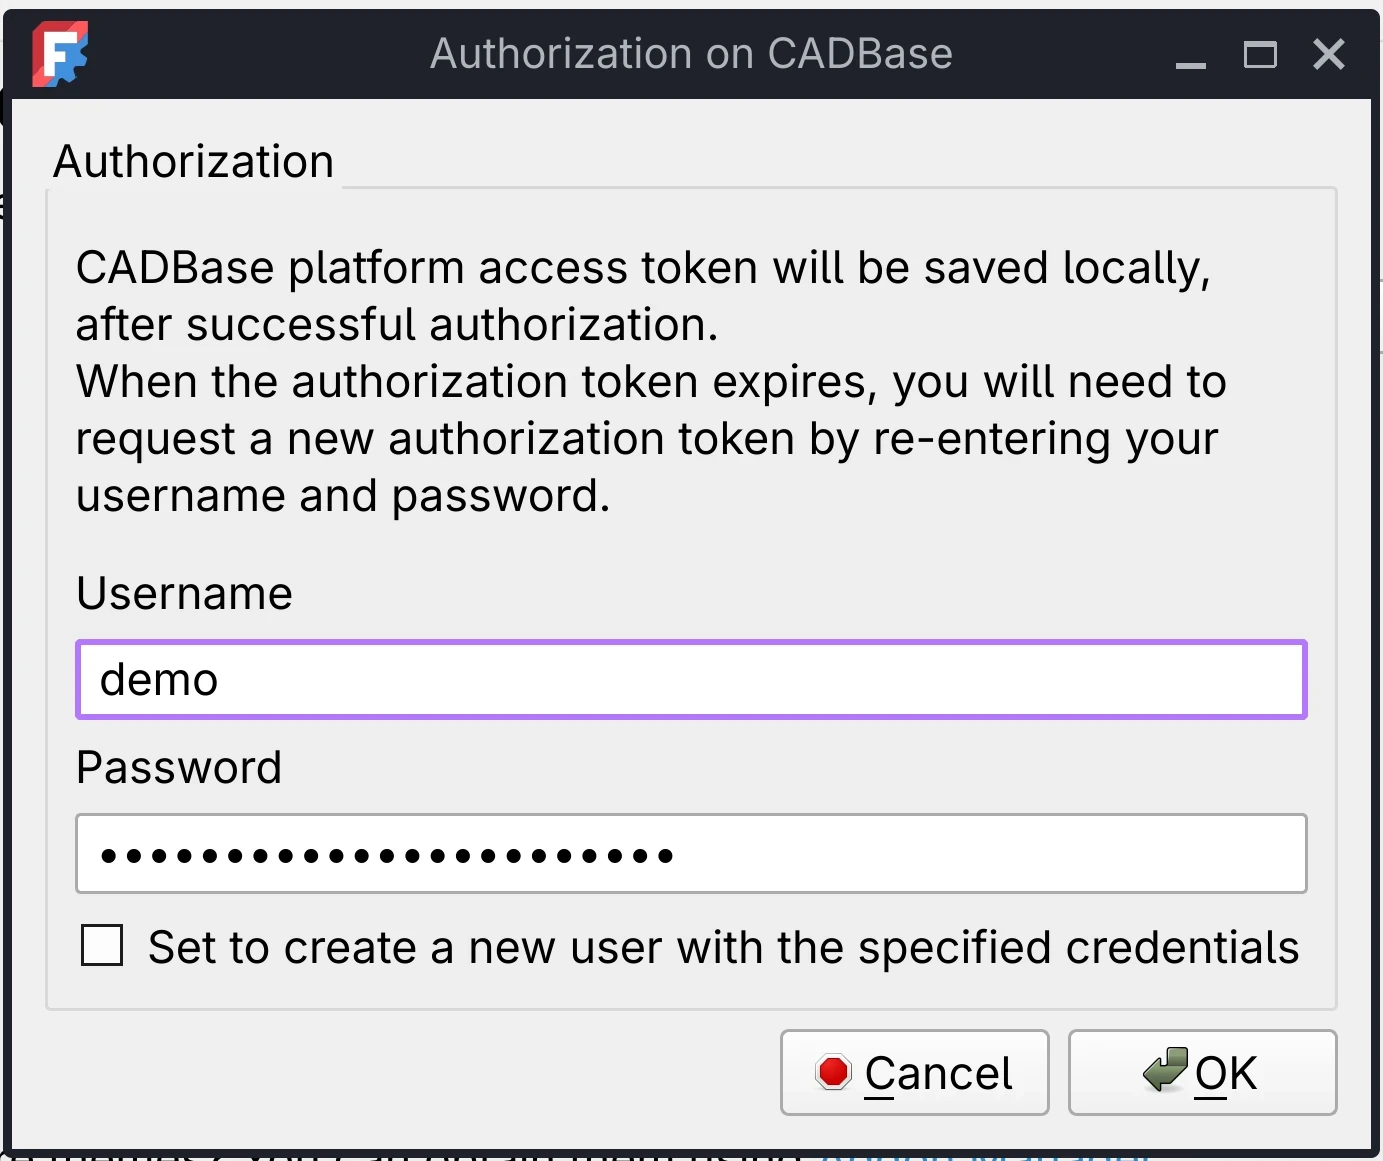
Authorization data will be saved — you won't need to enter the password on subsequent FreeCAD launches.
Token refresh: repeat steps 1 and 4.
Verification
Ensure the library is correctly connected to your account:
- Switch to the CADBase Library workbench.
Click
 Update list.
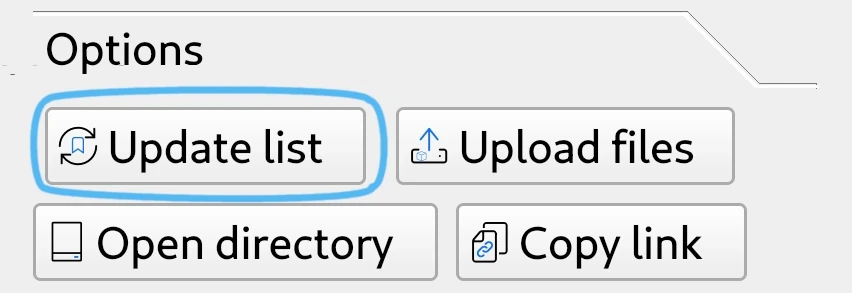
- Wait for your bookmarked components to appear in the library tree.
Note: After clicking the button, wait for the process to complete... Time depends on data volume and internet speed. Do not close FreeCAD or interrupt the process, otherwise data won't download completely.
Done! If you see the component list — setup was successful. You can proceed to work with the library.
Navigation and Controls
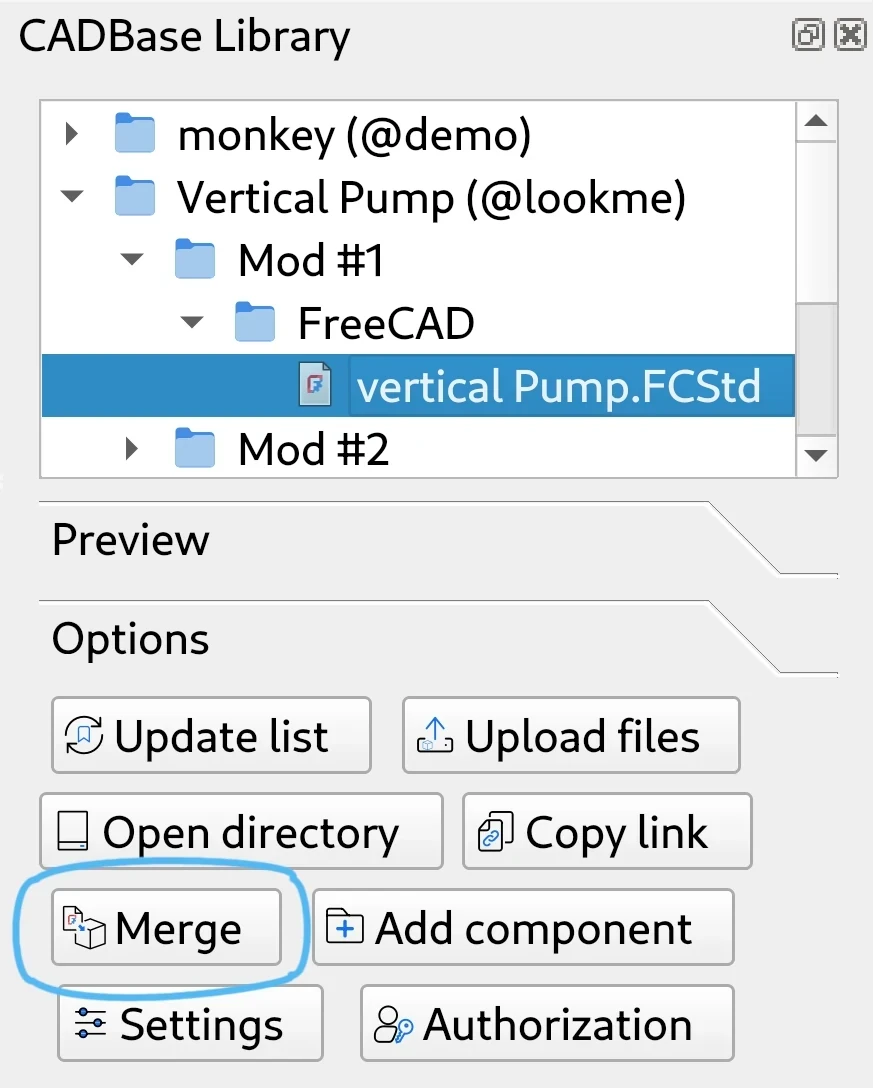
Local Storage Structure
- Library (blue block) — root level, displays bookmarked and downloaded components.
- Component (purple block) — this level displays component modifications.
- Modification (orange block) — this level displays file sets in local storage.
- File Set (green block) — files used through FreeCAD.
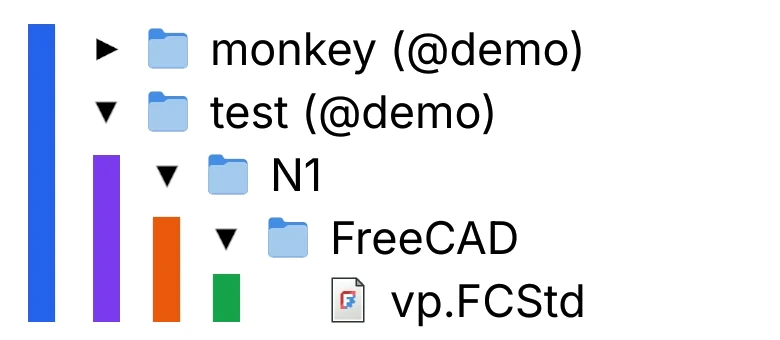
Library Tree Navigation
After refreshing the list, only component names are visible.
To load modifications and files, use double-click on tree elements:
- Component — updates the modification list of the selected component, creates folders for modifications and file sets in local storage.
- Modification or FreeCAD file set — downloads files from the FreeCAD file set.
- .FCStd file — imports the model into the current document.
To expand the list without synchronization, click the arrow (▸) next to the folder you want to expand.
Main Control Buttons
Synchronization
![]() Update list — loads the current component list from bookmarks.
Update list — loads the current component list from bookmarks.
![]() Upload files — opens dialog for sending local changes to the cloud.
Upload files — opens dialog for sending local changes to the cloud.
![]() New component — opens dialog for creating a component.
New component — opens dialog for creating a component.
Data Operations
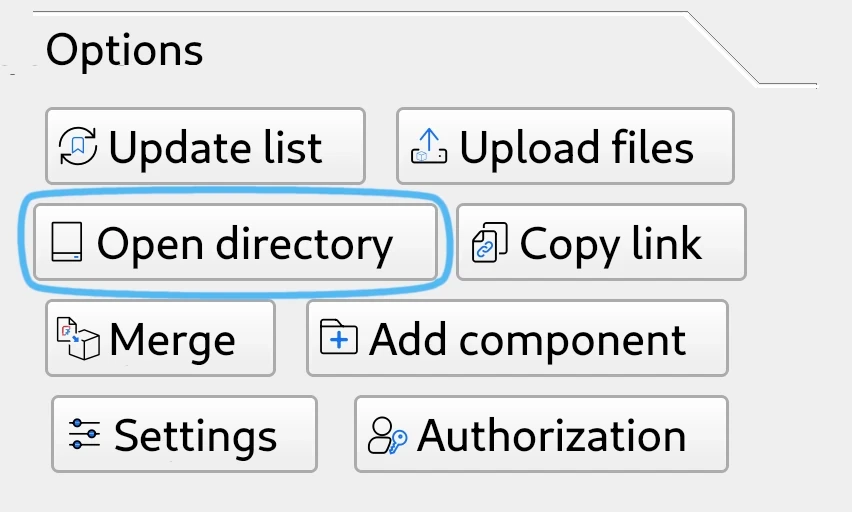
![]() Open directory — opens folder in File Explorer.
Open directory — opens folder in File Explorer.
![]() Copy link — copies component link for sharing.
Copy link — copies component link for sharing.
![]() Merge — imports selected file into current document.
Merge — imports selected file into current document.
System
![]() Settings — opens dialog for workbench configuration changes.
Settings — opens dialog for workbench configuration changes.
![]() Authorization — opens dialog for entering credentials and refreshing access token.
Authorization — opens dialog for entering credentials and refreshing access token.
Practical Applications
Creating New Component
A component can be a part, assembly, node, or any other design development object.
Creating a component in CADBase library through FreeCAD — 3 steps:
- Click the
 New component button.
 Enter the component name in the dialog window.
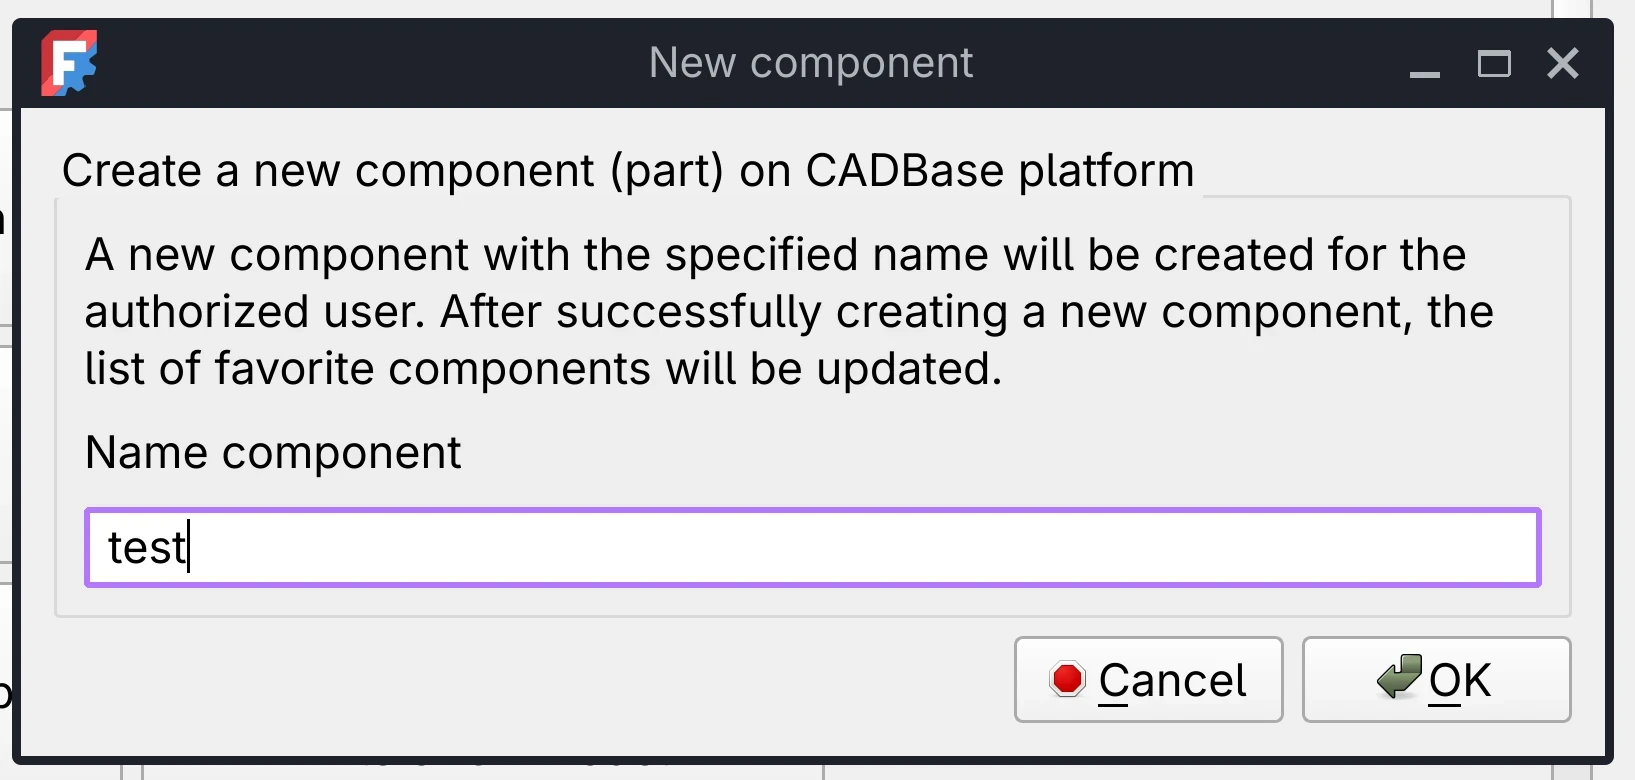
- Click OK to create.
Component creation process
After creation:
- Component will appear in your bookmarks.
- Initial modification N1 will be created.
- Component list in library will update.
Creating Component Structure
To start working with a component, create structure in local storage:
- Find the created component in the library tree
- Double-click on it
System will create folders for modifications and file sets.
Saving Document to File Set
Link document with component for further synchronization:
- Open or create a FreeCAD document.
- Save it to the file set folder:
CADBase Library→Component→N1→📁FreeCAD
Files from this folder will be uploaded to the cloud when sending changes.

FreeCAD folder location
Data Upload
To send changes to the cloud:
- Select modification with changed files.
You can select modification folder or specifically FreeCAD file set folder. - Click the
 Upload files button.
 - Review changes in the opened window:
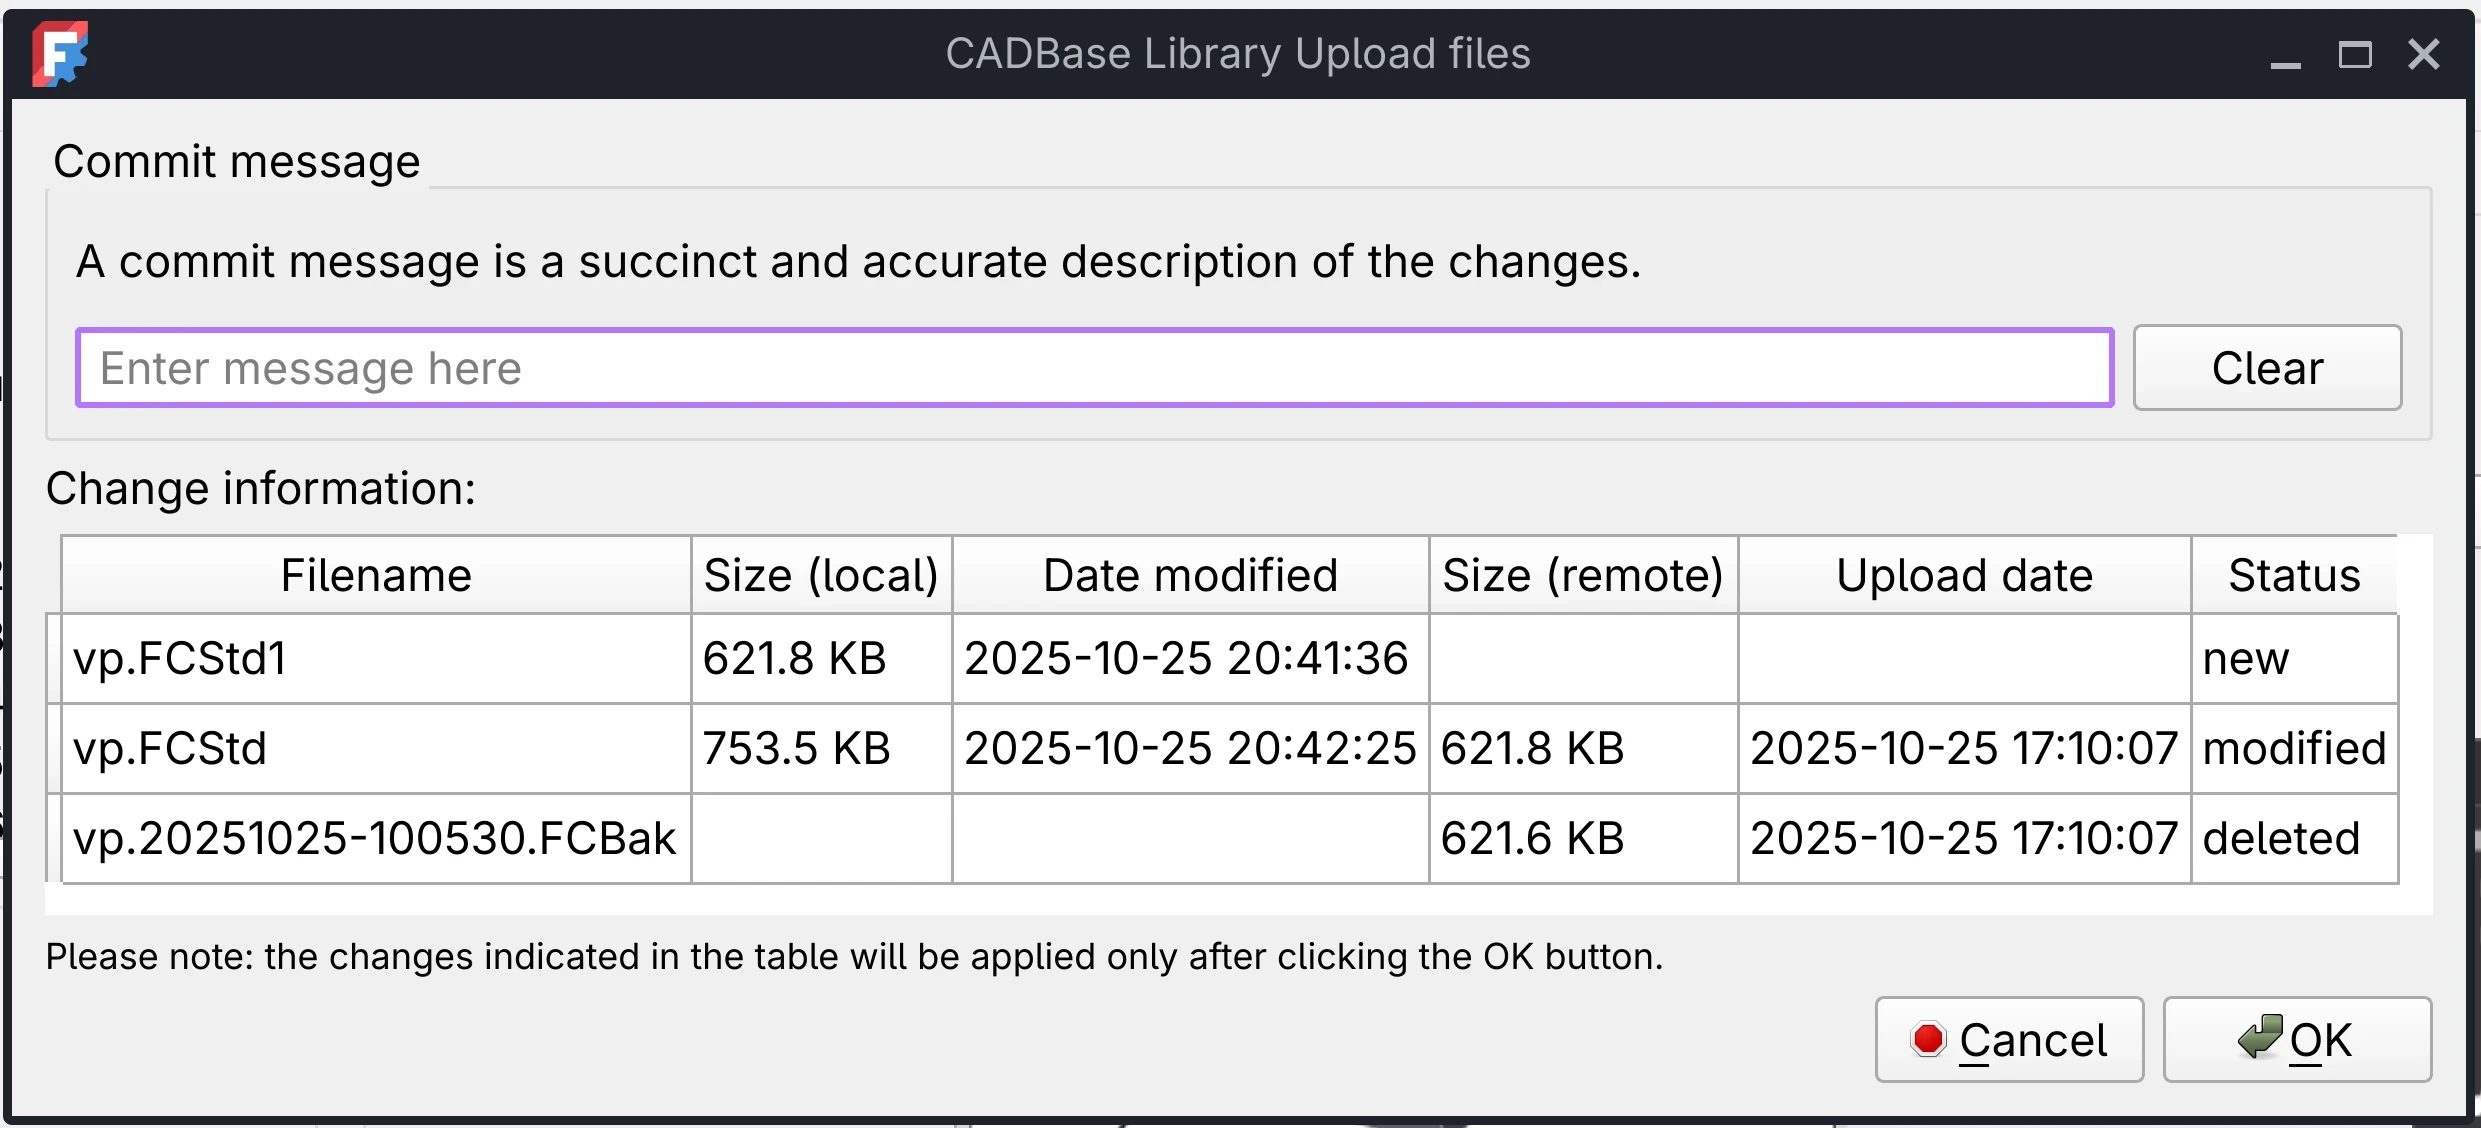
File upload window (example)
• new — file will be added to cloud• modified — file will replace old version in cloud• deleted — file will be deleted from cloud - Add change comment (optional).
Will help colleagues understand what was changed. - Click OK to start upload.
Change upload will start after clicking the button.
Upload progress can be tracked in FreeCAD's Report View panel.
Local File Replacement
If you need to download fresh file version from cloud:
- Find the file in library tree and click
 Open directory
 - Delete the file in the opened folder.
- Return to FreeCAD and double-click on the file set folder.
System will download current version from cloud.
If file was modified in cloud by another user or you want to revert your changes.
File Import to Document
Add ready-made parts and assemblies to your project:
- Find the file in component library.
- Click
 Merge or double-click the file.
 - Model will appear in your document
As separate object for editing.
Useful for: assemblies, using standard parts, working on complex projects in parts.
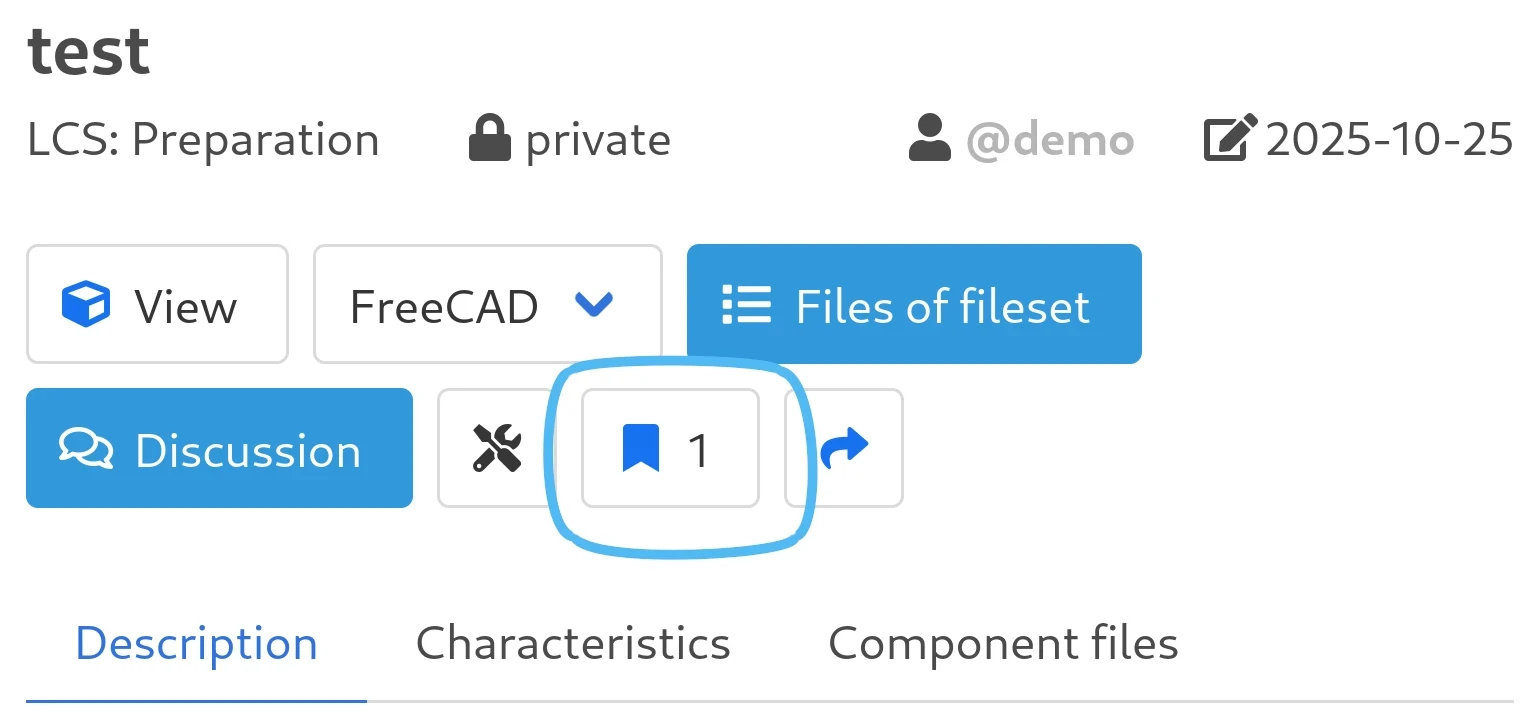
Bookmarks Management
Bookmarks help quickly find needed components. Manage them on CADBase platform:
- Find the component via search on CADBase.
- Open the component page.
- Click the bookmark icon on the component page
Adds or removes from bookmarks.
New bookmarks will appear after refreshing the list.
Already downloaded components will remain in library even if removed from bookmarks.
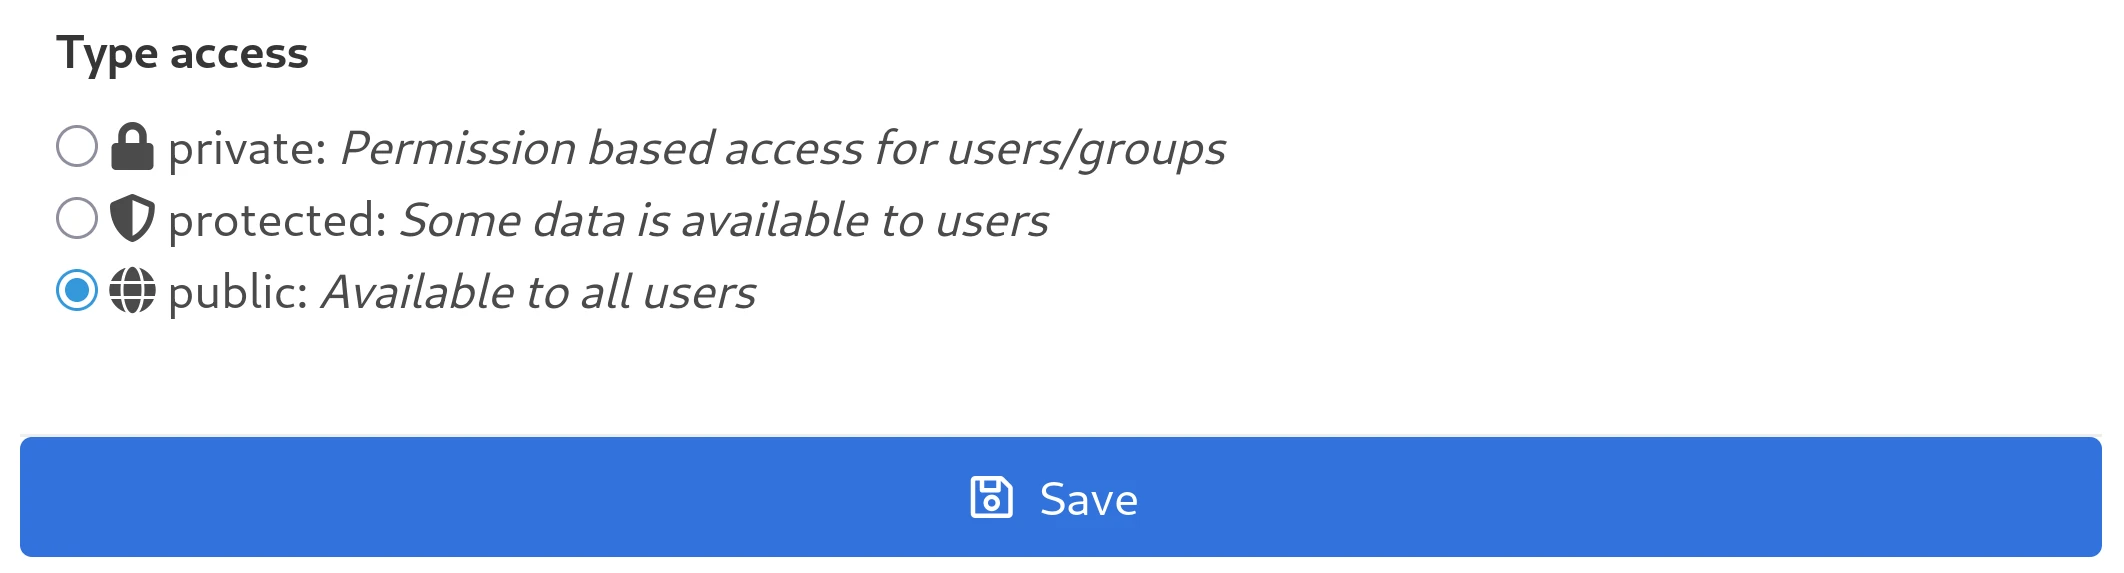
Component Access Configuration
New components are private by default. To open access:
- Click
 Copy link on component.
 - Open the link in browser.
- In component settings change access to "public".
- Save the change.
Now the component is visible to other users.
Access type selection on CADBase platform
Frequently Asked Questions (FAQ)
Can I work offline?
Yes, with previously downloaded components.
What happens with version conflicts?
Priority is given to local version.
Can I use one account on multiple computers?
Yes, without restrictions.
Can I use special characters in names?
You can use any characters, but note that component names will become folder names in file system.
Which files can be imported into document?
Supported formats: FCStd, STEP, BRP and BREP.
How is data security ensured?
Flexible access management system allows configuring data access rights for individual users and companies.
Can the workbench work in Intranet (isolated network)?
Yes, this requires deploying the server part inside the network.
Troubleshooting
Authorization error
Refresh token via ![]() Authorization button.
Authorization button.
No connection
Check internet connection and access to address specified in Server URL.
Components not displayed
Ensure they are added to favorites on the website.
Settings not applied
Some settings require FreeCAD restart.
Files not updating in cloud (SHA256 errors)
Enable Forcibly update files in settings.
Files not synchronizing (outdated UUID)
Delete component files from component folder and modification from file set.
Debugging
Create cadbase_file_2018.log file in library root, it will save logs and other data for debugging.